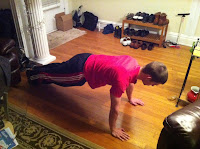
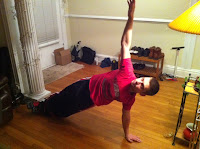
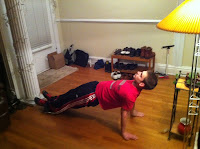
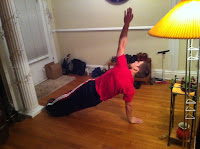
Difficulty - Moderate
Muscle Groups Addressed - Pectorals, Delts, Triceps, Core
Greetings! Back after a week hiatus and ready to supply more exercises for those of you hungry for more ways to move.
Today's exercise is a simple and effective combination motion. You'll mix a standard elevated (incline) pushup with a prone single leg crunch, mixing upper body and core strength to create a perfect storm of total body conditioning.
In the gym or at your desk, assume a plank position on an elevated surface. Concentrate on maintaining a straight-line body and a tight core. As in all plank starts, don't forget to breathe! Keep your feet together and your arms locked straight. From this position, do a standard pushup, making sure to complete the motion (all the way down until your chest is a few inches above the surface, then all the way up). Once back at the top, bring one leg off the ground and crunch your knee to your elbow on the same side. It's ok if you can't bring your knee all the way up, just make sure you contract your core and breathe. Plant your foot back on the ground, complete another pushup, and crunch with the opposite leg. Perform 8-10 repetitions on both sides for a total of 16-20 pushups. Remember these pushups are easier because of the elevated position of your hands. If you still can't do as many, try these against a taller surface or even a vertical wall.
Wednesday, February 22, 2012
Thursday, February 16, 2012
Day 24 - Ab Twists
Difficulty - Moderate
Muscle Groups Addressed - Rec
Now come on, baby... and do the twist!
Why anyone would purchase this nonsense is completely beyond me: http://amzn.com/B004G7D5GO
Let me show you a much easier (and arguably more effective) way to work your abdominals and obliques, right in the comfort of your very own desk chair!
Rotate around the ribcage. Any weight under 10 pounds will do. Keep your knees glued together. Stabilize from your hips to your ankles. Exhale as you rotate, inhale as you come to the center. Avoid rounding out the back. Remain in a tall, upright position. Avoid hunching forward at the shoulder blades.
To perform at your desk, sit tall in your chair and lift your legs up so that they are parallel to the floor (see Day 4 post!). Now slowly rotate your torso from side to side, tapping your arm-rests with your elbows if you have them (arm-rests that is... hopefully you have elbows).
Wednesday, February 15, 2012
Day 23 - Wrist Stretch
Difficulty - Moderate
Muscle Groups Addressed - Wrists, Forearms
You may be thinking to yourself, "Desk jockies must have jacked wrists from all that typing and clicking!". And I would say to you, "Nay, sir, we do not." Repetitive motions in the hands and wrists lead to inflammation of the muscle tendons and the compression of nerves leading to tingling, numbness, and pain over time - a familiar condition known as carpal tunnel syndrome. To stave off any nasty, nagging pain, might I recommend a simple and effective stretch to elongate your wrist muscles and reduce inflammation? I'm going to assume you said "yes".
Hold the palm of one hand up and cup it with the other hand. Pull gently back with your cupping hand while you push the heel of the covered hand away from you. You don't need a ton of pressure here, just enough to feel a stretch. Think about pulling your fingers towards your forearm. Hold for ten seconds then release and switch hands.
 A slightly more effective way to perform the same stretch is to do it on a surface like the floor or your desk. Turn your palms down and the heels of your hands away from your body. Slowly shift your body backwards so that you feel pressure on your wrists, such as in the picture here. You can slowly rock your body back and forth or hold the stretch then release. Bye bye wrist pain!
Muscle Groups Addressed - Wrists, Forearms
You may be thinking to yourself, "Desk jockies must have jacked wrists from all that typing and clicking!". And I would say to you, "Nay, sir, we do not." Repetitive motions in the hands and wrists lead to inflammation of the muscle tendons and the compression of nerves leading to tingling, numbness, and pain over time - a familiar condition known as carpal tunnel syndrome. To stave off any nasty, nagging pain, might I recommend a simple and effective stretch to elongate your wrist muscles and reduce inflammation? I'm going to assume you said "yes".
Hold the palm of one hand up and cup it with the other hand. Pull gently back with your cupping hand while you push the heel of the covered hand away from you. You don't need a ton of pressure here, just enough to feel a stretch. Think about pulling your fingers towards your forearm. Hold for ten seconds then release and switch hands.

Monday, February 13, 2012
Day 22 - Falling Pushups
Difficulty - Advanced
Muscle Groups Addressed - Pecs, Triceps, Deltoids
The falling pushup is a fun, plyometric version of the classic...
Be careful attempting this. I prefer to start in a squat position so that you're falling from a lower plane, lessening the chance of boo-boos. The squat start is also primed to work the glutes and quads simultaneously.
Start in a quat with your hands up, like you're ready for someone to snap a football at you. Make sure your butt is down and your back is straight. Contracting your core and inhaling, slowly fall forward and catch yourself, keeping your lower body locked in the squat position. This should not be the difficult part of the motion. Fall gently, and give with your shoulders as you allow your hands to absorb the force of the impact.
Now, with your body prone over the floor, shift the power to your pecs and shoulders and explode up as you rock your body backwards. Come back to your initial squat stance with your hands still raised. Repeat 8-10 times.
Sunday, February 12, 2012
Day 21 - Corn Cob Pull-ups
Difficulty - Advanced
Muscle Groups Addressed - Delts, Lats, Pecs, Biceps, Back
Had to throw another P90X favorite your way. The corn cob pullup is a juiced up version of the timeless classic. Before we dive in, perhaps a little basics tutorial on the multiple variations of grips you can use for a pull-up. Based on your grip, you can target multiple different muscle groups and adjust the intensity of the exercise.
Supinated (palms up) grip = Chin-up (more biceps, easier)
Pronated (palms down) grip = Pull-up (more back, harder)
Just make sure no matter which variation you're performing, you come all the way to the bottom and fully extend your arms. If you don't, you're not getting the most out of the exercise and you're neglecting all your synergist and dynamic stabilizer muscle groups. Also, try not to "kip", or use a jerking motion (momentum) to get yourself over the bar. Nice, slow, controlled movements will maximize the benefit of this exercise.
For corn-cobs, choose your grip and hang down with your arms fully extended. Slowly raise yourself up until your head is over the bar. Once you reach the top, in an isometric hold, shift your body to the left, then shift your body to the right, then come back to the center. Now, slowly release and lower your body down to a full hanging position. Repeat as many reps as you can. Again, the home/work version is exactly the same, you just have to find a doorframe or a pipe to hang from (careful to make sure it's not a heated pipe...)
Muscle Groups Addressed - Delts, Lats, Pecs, Biceps, Back
Had to throw another P90X favorite your way. The corn cob pullup is a juiced up version of the timeless classic. Before we dive in, perhaps a little basics tutorial on the multiple variations of grips you can use for a pull-up. Based on your grip, you can target multiple different muscle groups and adjust the intensity of the exercise.
Supinated (palms up) grip = Chin-up (more biceps, easier)
- Chin-up with narrow grip - 4-6 inches apart; engages forearms more
- Chin-up with neutral grip - ~12 inches apart; overloads elbows, heavy use of biceps
- Chin-up with wide grip - 12-24 inches apart; engages
Pronated (palms down) grip = Pull-up (more back, harder)
- Pull-up with narrow grip - Emphasizes lower lats and works biceps due to ineffective angle
- Pull-up with neutral grip - Overloads forearms and shoulder stabilizers, heavy use of the back
- Pull-up with wide grip - Emphasizes upper lats and upper pectorals
Just make sure no matter which variation you're performing, you come all the way to the bottom and fully extend your arms. If you don't, you're not getting the most out of the exercise and you're neglecting all your synergist and dynamic stabilizer muscle groups. Also, try not to "kip", or use a jerking motion (momentum) to get yourself over the bar. Nice, slow, controlled movements will maximize the benefit of this exercise.
For corn-cobs, choose your grip and hang down with your arms fully extended. Slowly raise yourself up until your head is over the bar. Once you reach the top, in an isometric hold, shift your body to the left, then shift your body to the right, then come back to the center. Now, slowly release and lower your body down to a full hanging position. Repeat as many reps as you can. Again, the home/work version is exactly the same, you just have to find a doorframe or a pipe to hang from (careful to make sure it's not a heated pipe...)
Saturday, February 11, 2012
Day 20 - Frog Stretch
Difficulty - Moderate
Muscle Groups Addressed - Inner Thighs, Groin, Hips, Lower Back
A great stretch for anyone that has tight thighs or shares my strangely specific New Year's resolution: side splits by the end of 2012. A move I haven't been able to do since I was 7 or 8 years old, the side split is my unicorn. Seemingly unattainable, but I know it's out there somewhere... if I just keep looking... and keep stretching.
This is a slightly more advanced move in the gym but very easy to do at your desk - just sit on the edge of your chair and push your knees out with your elbows. Or assume a butterfly stretch (remember, the one from gym class years ago?) by bringing your feet up to your chair, the soles of your feet together, and pushing your knees down with your hands until you feel a stretch.
 At the gym, make sure you have a nice soft surface or a mat so as not to hurt your knees when you do this. Start on your hands and knees and then come to your elbows. Slowly start to inch your knees apart from one another, but as you slide out, keep your back flat and your feet pointed strait backward. It's also very easy to want to lean forward, but push your butt back to maintain the stretch in your groin. When you've come to a point where you're feeling the stretch, stop and hold it. Keep your eyes pointed down at the ground, your arms soft, butt back, back flat. Breathe. Hold here for 30 seconds. If at the end of the 30 seconds you feel like you can stretch more, push your knees slightly wider with your hands (or just slide them out further) until you feel that familiar level of stretch discomfort again. Hold for another 30 seconds. Breathe deeply. Bring your body forward to come out of the stretch. You'll be ready to pop a split on the dance floor in no time :)
Muscle Groups Addressed - Inner Thighs, Groin, Hips, Lower Back
A great stretch for anyone that has tight thighs or shares my strangely specific New Year's resolution: side splits by the end of 2012. A move I haven't been able to do since I was 7 or 8 years old, the side split is my unicorn. Seemingly unattainable, but I know it's out there somewhere... if I just keep looking... and keep stretching.
This is a slightly more advanced move in the gym but very easy to do at your desk - just sit on the edge of your chair and push your knees out with your elbows. Or assume a butterfly stretch (remember, the one from gym class years ago?) by bringing your feet up to your chair, the soles of your feet together, and pushing your knees down with your hands until you feel a stretch.

Friday, February 10, 2012
Day 19 - Inner Thigh Press
Difficulty - Easy
Muscle Groups Addressed - Inner Thighs, Abductors

Been hankering for a great thigh-buster exercise? Shout out to my good friend, Coutts for relaying this one to me. If you're concerned about someone walking by and catching you doing headstands in your cube, this move shouldn't arouse too much attention in the workplace.
You'll need something sturdy but small to squeeze between your legs. Something like a durable water bottle (empty, please!) or a ream of paper. Let's say we used a water bottle.
- Sit up tall placing the bottle between the knees/shins.
- Squeeze the bottle lightly to keep it from dropping to the floor.
- Slowly squeeze the bottle, contracting the inner thighs.
- Release just slightly, keeping some tension on the bottle.
Thursday, February 9, 2012
Day 18 - Seated Glute Stretch
Difficulty - Easy
Muscle Groups Addressed - Glutes
 Been sitting in that desk chair for umpteen hours and feel like your back is going to explode? Part of your problem is that your gluteal (butt) muscles are tightening and pulling on your lower back. It's all inter-connected.
This is a simple and effective way to loosen up your glutes and take some of that tension out of your lower back and improve your sitting posture.
Sit up tall, ankles below the knees, with an open chest. Cross one leg over your other thigh, as in the picture on the right. The ankle of your raised leg should be just over the knee of your planted leg. Inhale deeply.
 As you exhale slowly, keeping your chest as big as possible, hang your hands down to your planted foot until you feel a stretch. You can hang here or attempt a neuro-integrated stretch. This technique has you create an isometric contraction against a resistance barrier in your stretch, helping you achieve an optimal state of neuro-flexibility and a much deeper stretch. It's much simpler than it sounds... so let's just move on.
For the neuro-integrated stretch - Take another deep breath in this hanging position and drive the knee of your raised leg towards the ground (you can use your forearm or elbow to push it down). Hold this for 5 seconds and then relax your knee. As you exhale, knee in neutral position, you should be able to dip down slightly further towards your planted foot. Do this one more time - inhale, push your knee down, dip further. This may be enough for you to get your hands to the floor. If not, don't worry, as with all stretches - it will come with time.
Don't forget to switch legs to address the other side. Back feeling any better?
Muscle Groups Addressed - Glutes

This is a simple and effective way to loosen up your glutes and take some of that tension out of your lower back and improve your sitting posture.
Sit up tall, ankles below the knees, with an open chest. Cross one leg over your other thigh, as in the picture on the right. The ankle of your raised leg should be just over the knee of your planted leg. Inhale deeply.
 As you exhale slowly, keeping your chest as big as possible, hang your hands down to your planted foot until you feel a stretch. You can hang here or attempt a neuro-integrated stretch. This technique has you create an isometric contraction against a resistance barrier in your stretch, helping you achieve an optimal state of neuro-flexibility and a much deeper stretch. It's much simpler than it sounds... so let's just move on.
For the neuro-integrated stretch - Take another deep breath in this hanging position and drive the knee of your raised leg towards the ground (you can use your forearm or elbow to push it down). Hold this for 5 seconds and then relax your knee. As you exhale, knee in neutral position, you should be able to dip down slightly further towards your planted foot. Do this one more time - inhale, push your knee down, dip further. This may be enough for you to get your hands to the floor. If not, don't worry, as with all stretches - it will come with time.
Don't forget to switch legs to address the other side. Back feeling any better?
Wednesday, February 8, 2012
Day 17 - Suspended Leg Raise
Difficulty - Moderate/Advanced
Muscle Groups Addressed - Core, Shoulders, Lats, Biceps
The first suspended/pull-up exercise! Wooooot! To those of you who would retort, "but I don't have a pull-up bar!" I say pish-posh. There's always something to hang from. A doorframe, tree branch, a tall friend's bicep. Just find something above your head and get to danglin'!


We'll start with a simple hang. With hands shoulder-width apart, just hang down from your surface of choice. Here, I'm suspended from my door frame, with my toes on the floor. For this exercise, it's fine if you toe-tap in between reps, if only to keep yourself from swinging.
Now slowly lift your feet upwards. Attempt to keep your knees locked, legs straight as you do so. Lower your legs back down to a hanging position (tap your toes to steady yourself) and then repeat. Shoot for 8-10 repetitions.

 For an advanced version and to really engage your lats, pull yourself up part way, so that your biceps and forearms are locked at a 90 degree angle. Now perform the leg lift exercise the same way, but keeping your arms locked at the top. Yikes!
Tuesday, February 7, 2012
Day 16 - Ball Knee Tucks
Difficulty - Moderate
Muscle Groups Addressed - Core, Shoulders
The knee tuck is one of my favorite ab exercises. In addition to micro-targeting your abdominals with the crunch motion, the jack knife works your obliques and core stabilizing muscles.
You'll need a stability ball for the gym version - or a chair with wheels for the work version. Begin in an elevated plank with your feet up on the stability ball, fairly close together. For an easier version, rest your shins on the ball. For a more advanced variation, stay up on your toes. Keeping your arms perpendicular to the ground, exhale slowly, contract your core, and roll the ball in with your feet. Keep your body as calm as possible (you might shake a little bit), as you bring your knees in as far as you can to your chest. If you can contract the entire way, your feet will be sitting flat against the ball at this point. Now inhale as you extend your body back to the starting plank position. Shoot for 10 repetitions.
If you don't have a rolling chair at work, get into an elevated plank on any sturdy, stationary surface and tuck your knees in to your chest, one leg at a time, leaving the other leg planted on the chair.
Monday, February 6, 2012
Day 15 - Turbine
Difficulty - Moderate
Muscle Groups Addressed - Shoulders, Triceps, Core
This is an original. It combines strength and flexibility with slow, controlled, core-engaged motion.
Equipment you'll need:
1. Yourself
2. A floor
Sweet! We all have at least one of each!
 Start in a plank position. Core strong, eyes on the floor below you. Tuck your pelvis and keep your back straight. Make sure your butt doesn't sag. No one likes a saggy butt. Hold this position for 5 seconds.
 From this position, pick one hand (here, I started with my right hand) and begin to drift it up to the sky. Simultaneously, spin your feet in the same direction so that one foot now rests on the other. Reach your arm straight up and let your eyes rest on your hand. If the balance is still too difficult, keep your eyes focused on a spot on the floor. Keep your body a straight line from your feet to your head - don't let anything sag to the ground. Keep your core tight. Hold this position for 5 seconds.
 Now, contracting your core, continue to spin your hand around until it rests on the floor with the other hand. If your shoulders/triceps feel too strained here, you can point your fingers outwards from your body. If you're feeling flexible, point your fingers straight back. Hold a straight-leg table position, with toes pointed up, butt held high, and core tight for 5 seconds.
 Again, use your core to come out of the table position twisting again in the same direction into a skyward reach on your other hand. Reach high with your hand and follow it with your eyes. Keep everything straight and calm. Keep the hip raised up. Same principles here, and hold for 5 seconds.
Lastly, spin one more time into a plank position. Take care not to fall into any of these poses. These should be slow, controlled movements. If you're using your core properly and moving slowly, you shouldn't feel any impact on your hands or wrists. Your body should be almost totally relaxed except for your core. Your shoulders and triceps will grow fatigued as well from supporting your weight. Once you've done one full "rotation", come back around the other way.
Sunday, February 5, 2012
Day 14 - Crane
Difficulty - Advanced
Muscle Groups Addressed - Wrists, Core, Groin
 The crane pose (Bakasana) is a great builder and test of core strength and stability. Like our handstands, these should be gently eased into in order to prevent injury and muscle strain. This pose in particular should not overwork you, but should instead leave you feeling centered and flexible.
I'm still working on this pose, so my variation isn't true to proper yoga form. What you'll see here is a variation for those newer to balance yoga poses.
Start in a deep squat, with your body bent forward and a curved back. Plant your hands firmly where your eyes meet the floor. In my variation of this pose, you can see that my knees are on the outside of my elbows. A proper Bakasana pose should have your knees and upper shins tucked into your armpits. Flexibility is my weakness, but it will come with time and practice. Now start to lift up onto the balls of your feet and lean even further forward, taking the weight off of your legs and onto your upper arms and hands. Think about contracting your core and rounding your back.

Exhale, and put all of your weight on your upper palms, lifting the balls of your feet completely off the floor. You are now in crane pose. Contract your core and keep your legs tight against your arms. Stay here and breathe for 30 seconds - 1 minute.
Muscle Groups Addressed - Wrists, Core, Groin
 The crane pose (Bakasana) is a great builder and test of core strength and stability. Like our handstands, these should be gently eased into in order to prevent injury and muscle strain. This pose in particular should not overwork you, but should instead leave you feeling centered and flexible.
 I'm still working on this pose, so my variation isn't true to proper yoga form. What you'll see here is a variation for those newer to balance yoga poses.
Start in a deep squat, with your body bent forward and a curved back. Plant your hands firmly where your eyes meet the floor. In my variation of this pose, you can see that my knees are on the outside of my elbows. A proper Bakasana pose should have your knees and upper shins tucked into your armpits. Flexibility is my weakness, but it will come with time and practice. Now start to lift up onto the balls of your feet and lean even further forward, taking the weight off of your legs and onto your upper arms and hands. Think about contracting your core and rounding your back.

Exhale, and put all of your weight on your upper palms, lifting the balls of your feet completely off the floor. You are now in crane pose. Contract your core and keep your legs tight against your arms. Stay here and breathe for 30 seconds - 1 minute.
Saturday, February 4, 2012
Day 13 - Warrior III Tucks
Difficulty - Advanced
Muscle Groups Addressed - Glutes, Hamstrings, Quads, Core
This is a borrowed move from everybody's favorite digital trainer, Tony Horton. P90X2, an at-home workout program sequel to the well-known P90X focuses heavily on balance and core-work, which I think are both well encompassed within this exercise.
 A Warrior III Yoga Pose (Virabhadrasana III) looks like this:
Begin in a lunge position with one knee bent forward at a 90 degree angle and the other leg straight behind you. You can rest your arms at your side or gently on your front knee. Simultaneously bring your back leg up while straightening your front leg, and bring your hands up on either side of your head, palms facing each other. Your entire body should be parallel to the floor. Hold this pose for 5 seconds.

 << Now, slowly tilt your body upwards while bending the back leg. Keep your hands extended out by your head and raise them into the sky as your body tilts up. Hold the leg in this bent position, arms high for 5 seconds.
>> Bring the opposite arm from your raised leg (If your left knee is up, crunch with your right arm) down so that you make contact between your elbow and your knee. Use the other arm for balance as you hold this crunched position for 5 seconds. Breathe. Try to reverse the arm and leg movements back into the Warrior III pose. If your balance is waning, then bring your body down to a standing position and repeat the motion on the other leg. This is a great routine that will do amazing things for your balance and strengthen your core.
Muscle Groups Addressed - Glutes, Hamstrings, Quads, Core
This is a borrowed move from everybody's favorite digital trainer, Tony Horton. P90X2, an at-home workout program sequel to the well-known P90X focuses heavily on balance and core-work, which I think are both well encompassed within this exercise.
 A Warrior III Yoga Pose (Virabhadrasana III) looks like this:
 Begin in a lunge position with one knee bent forward at a 90 degree angle and the other leg straight behind you. You can rest your arms at your side or gently on your front knee. Simultaneously bring your back leg up while straightening your front leg, and bring your hands up on either side of your head, palms facing each other. Your entire body should be parallel to the floor. Hold this pose for 5 seconds.

 << Now, slowly tilt your body upwards while bending the back leg. Keep your hands extended out by your head and raise them into the sky as your body tilts up. Hold the leg in this bent position, arms high for 5 seconds.
 >> Bring the opposite arm from your raised leg (If your left knee is up, crunch with your right arm) down so that you make contact between your elbow and your knee. Use the other arm for balance as you hold this crunched position for 5 seconds. Breathe. Try to reverse the arm and leg movements back into the Warrior III pose. If your balance is waning, then bring your body down to a standing position and repeat the motion on the other leg. This is a great routine that will do amazing things for your balance and strengthen your core.
Friday, February 3, 2012
Day 12 - Handstand Pushups
Difficulty - 2xAdvanced
Muscle Groups Addressed - Shoulders/Upper Pecs
 So I'm kind of obsessed with handstands now... they're insanely fun. Trust me, you'll get there if you start smart and slow. Today's move is definitely for the more advanced audience. Think of it as a fully elevated decline pushup...
See the previous day's post for the basics of how to get into a handstand. Once again, make sure you're warmed up and in the right mindset.

 Once your butt is where your head should be and vice-versa, take a few deep breaths and tilt your head up a little bit. Unlike the picture, you should try to keep your legs straight... I'm playing with keeping my feet off the wall which is why my legs are flayed out a little bit for balance (next step is doing these away from the wall entirely!) Now, unlock your shoulders and your arms and slowly lower your nose towards the ground. Now come back up into a straight arm position, and repeat. Don't do too many of these, especially at first, since you want enough energy left in your core to come out of the handstand gracefully. Focus on putting all your weight in your hands. Keep your butt tucked in and your spine straight. You'll get a great shoulder/pec workout if your body is a straight line. Do these pushups nice and slow. Mix in a few isometric holds at the bottom once you're comfortable.
Muscle Groups Addressed - Shoulders/Upper Pecs

See the previous day's post for the basics of how to get into a handstand. Once again, make sure you're warmed up and in the right mindset.

 Once your butt is where your head should be and vice-versa, take a few deep breaths and tilt your head up a little bit. Unlike the picture, you should try to keep your legs straight... I'm playing with keeping my feet off the wall which is why my legs are flayed out a little bit for balance (next step is doing these away from the wall entirely!) Now, unlock your shoulders and your arms and slowly lower your nose towards the ground. Now come back up into a straight arm position, and repeat. Don't do too many of these, especially at first, since you want enough energy left in your core to come out of the handstand gracefully. Focus on putting all your weight in your hands. Keep your butt tucked in and your spine straight. You'll get a great shoulder/pec workout if your body is a straight line. Do these pushups nice and slow. Mix in a few isometric holds at the bottom once you're comfortable.
Thursday, February 2, 2012
Day 11 - Handstands
Difficulty - Advanced
Muscle Groups Worked - Shoulders
There are a lot of factors that go into a successful handstand, so be sure you're ready for it before you attempt it. The stand we'll do is against the wall, so the balance portion doesn't play in as much as it would on an open floor. It also eliminates the fear of toppling over your head. But you should still feel confident that you have a strong core and shoulders before you attempt this. "Muscle Groups Worked" should really read "Core, Shoulders, Core" because the process of getting in and out of the stand is entirely core-related. That said, trust me, a handstand is 100% attainable with a little practice and a little courage.
 Start by warming up with a few pushups and holding a plank for ~30 seconds. First, determine which leg is your "kick-up" leg. This is your dominant foot that you would default to kick a soccer ball or punt a football with. This is the leg that you'll use to kick your body up into the air. Find a sturdy, picture-free wall (far away from grandma's ashes) and begin in a sprinter's stance, with your hands just a few inches from the wall. Keep your arms locked straight. Take a few practice "kicks", just launching off of your dominant foot a little bit. Keep your core contracted and your non-dominant foot pulled in slightly and bent at the knee. When you're ready, kick (explode!) off of your dominant foot. Don't be afraid to put some extra oomph into the kick... since you're against the wall, there's no way you're going to topple over backwards. Concentrate on putting your energy into your core as opposed to your legs. This will help you land as lightly as possible on the wall with your non-dominant foot. Once you hit, or rather, lightly graze the wall, pause for a second and ensure you have your balance. When you're confident that you can support yourself in this position, straight your non-dominant leg to join your other straight leg. Keep your body straight. Now pause and breathe... slowly. Feel the weight in your hands. As you hold this position, you'll start to feel a burn in your shoulders. When you're ready to come out, ensure your core is tightened, and slowly bring your body back the same way you came up. Think of it almost as a reverse crunch. You should not be landing with any sort of velocity on the ground if you're tightening your core properly. You just did a handstand! Wait... you just did a freaking handstand?! As you get more comfortable, you can start playing with floating away from the wall a little bit to assess your balance. You'll be popping handstands in the hall at work in no time :)
Muscle Groups Worked - Shoulders
There are a lot of factors that go into a successful handstand, so be sure you're ready for it before you attempt it. The stand we'll do is against the wall, so the balance portion doesn't play in as much as it would on an open floor. It also eliminates the fear of toppling over your head. But you should still feel confident that you have a strong core and shoulders before you attempt this. "Muscle Groups Worked" should really read "Core, Shoulders, Core" because the process of getting in and out of the stand is entirely core-related. That said, trust me, a handstand is 100% attainable with a little practice and a little courage.

Wednesday, February 1, 2012
Day 10 - Tricep Dips
Difficulty - Easy
Muscle Groups Addressed - Triceps, Shoulders

Tricep dips are an incidental wellness no-brainer. An exercise that you can literally do anywhere, there is something simply sweet about something so sweetly simple. Exactly the same in the gym as it is in your hotel room (or home/office), you'll need two elevated surfaces (or you can perform it starting in a table pose on the floor) to perform a dip.
 Start with your hands under your shoulders, arms extended on one surface. Your legs should be straight with your heels resting on top of the other surface. Here, I used a chair and the bed... You can easily use two beds, or a chair and a desk, two chairs, or just do this exercise on the floor. Slowly lower your body down until your triceps and your forearms form a right angle, then come back up. If you want to add an element, pick one of your feet up slightly and hold it there. If you have a friend with you, have him/her place a weight (books, boxes, suitcase) on top of your lap.
Subscribe to:
Comments (Atom)