Difficulty - Easy
Muscle Groups Addressed - Lower Back, Hip
So I was traveling today, and a friend smartly suggested that I post an exercise that you could perform on an airplane. Your options are limited here, especially if you're crammed into a window seat like I was, but I've been preaching that you can discover wellness opportunities anywhere, and this circumstance is no different.
I was going to get the passenger next to me to snap a picture, but he was literally asleep from the moment the doors shut to the moment they re-opened. So you'll have to use your imagination as I try to explain this stretch as thoroughly as I can.
In your seat, assume proper posture - feet flat on the ground, shoudlers square, pelvis tucked in. Wrap your hands under one of your knees and gently start to bring your knee up towards your chest. Continue to pull your knee up until you feel a slight stretch in your lower back (you may also feel a little tension in your hip). Hold this position for 30 seconds. Switch legs and repeat. This stretch will help release tension in your lower back, which is most likely screaming from having to sit in a terrible airplane seat for a few hours (mine definitely was!). Come back for more tomorrow!
Tuesday, January 31, 2012
Monday, January 30, 2012
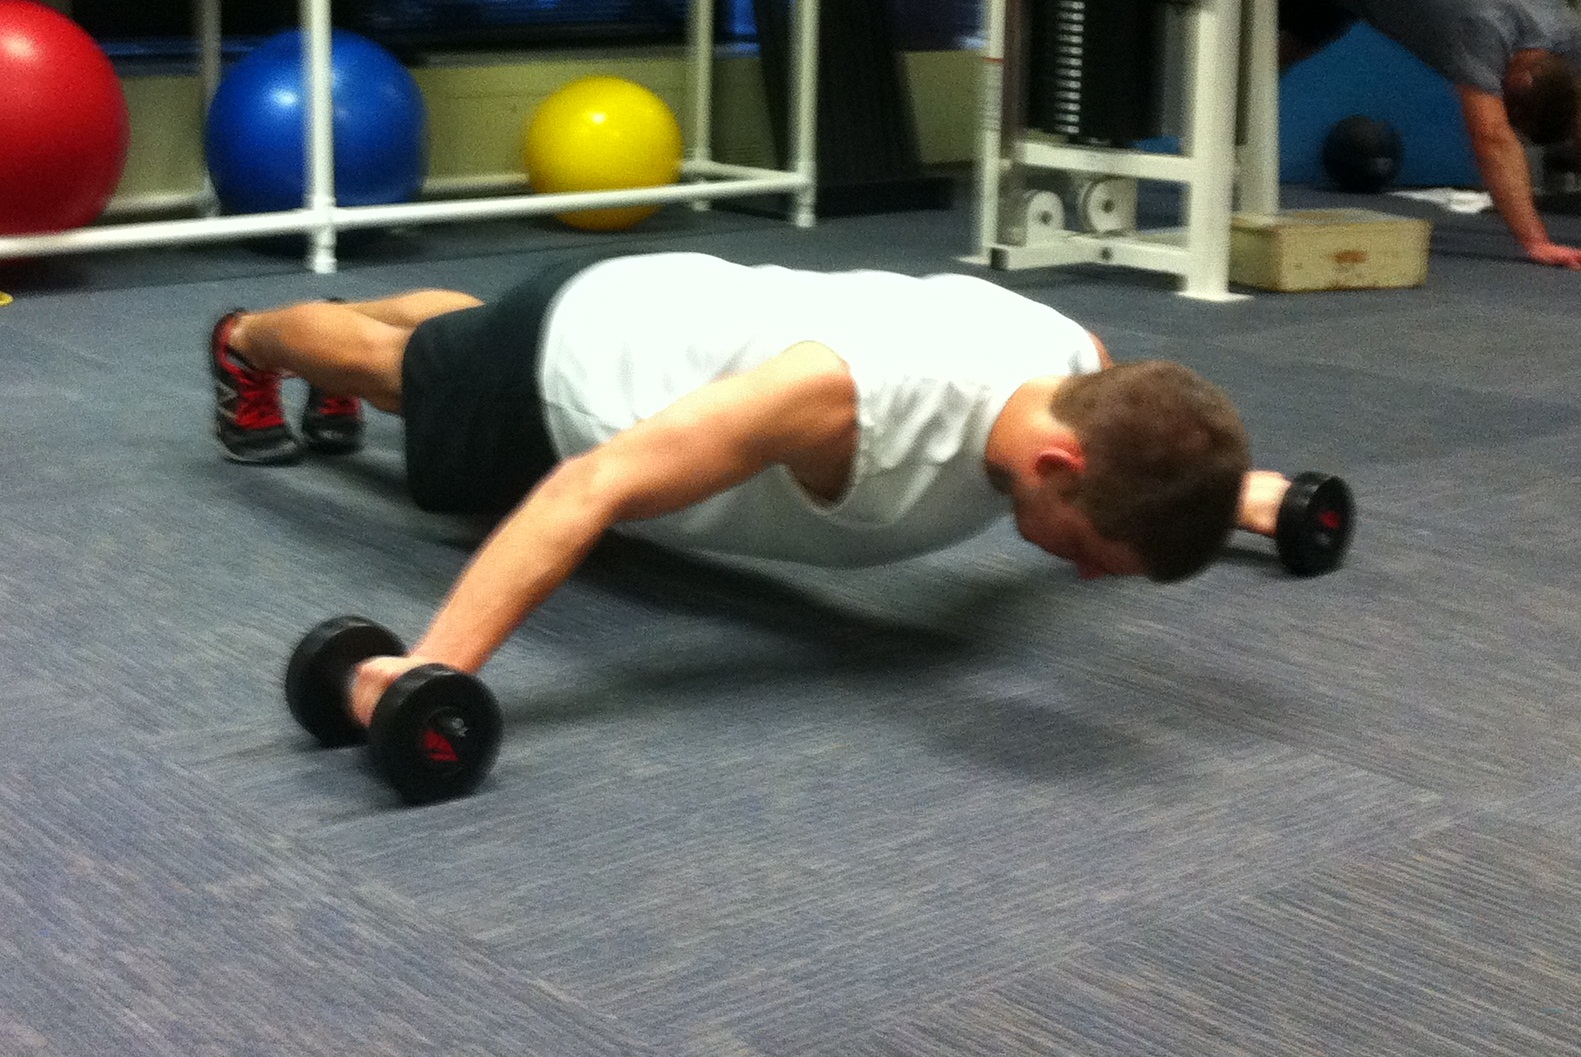
Day 8 - Super Wide Pushups/Crucifix Rolls
Difficulty - Advanced
Muscle Groups Addressed - Pectorals, Deltoids, Lats

 Let's throw in an advanced move for kicks. Start slow with this one, as there is a distinct possibility that you may smash your face. The gym version employs the use of 2 round dumbbells (don't use hex, you won't be able to roll them...). Start in a close-grip position, back straight, head down. Slowly roll your hands out as wide as you can and hold the position for a second. Keep your core tight... this is a very difficult hold. Then, with all the might of He-Man, keeping your arms fairly straight, start to bring your hands back to the starting position. Tough, eh?

 A simpler variation that doesn't work the shoulders nearly as much is the pec fly. You can do this easily with dumbbells on a bench, as shown here. For this modification, keep your back flat on the bench (push down with your pelvis and resist the temptation to arch your back), and do not let your hands fall below the plane of the bench. Over-extending here will hurt your shoulders.

 The office/home version is as follows: start by lying face down in a T-position. Be aware of how much force you'll have to exert to lift your body off the ground in this position. As a general rule, I'll start with arms fully extended (as big a wing-span as I can muster), and I'll note where my wrists lie on the ground. Then I'll pull my hands inward until the tips of my thumbs rest where my wrists were. This position allows me enough leverage to get my body off the ground but is still wide enough to mimic the move. Put all your energy into your hands and force your body upward... hold for 3 seconds, then come back down. If this is too much, do pushups with your hands slightly more than shoulder width apart and work towards getting wider and wider.
Muscle Groups Addressed - Pectorals, Deltoids, Lats
 Let's throw in an advanced move for kicks. Start slow with this one, as there is a distinct possibility that you may smash your face. The gym version employs the use of 2 round dumbbells (don't use hex, you won't be able to roll them...). Start in a close-grip position, back straight, head down. Slowly roll your hands out as wide as you can and hold the position for a second. Keep your core tight... this is a very difficult hold. Then, with all the might of He-Man, keeping your arms fairly straight, start to bring your hands back to the starting position. Tough, eh?
 A simpler variation that doesn't work the shoulders nearly as much is the pec fly. You can do this easily with dumbbells on a bench, as shown here. For this modification, keep your back flat on the bench (push down with your pelvis and resist the temptation to arch your back), and do not let your hands fall below the plane of the bench. Over-extending here will hurt your shoulders.
 The office/home version is as follows: start by lying face down in a T-position. Be aware of how much force you'll have to exert to lift your body off the ground in this position. As a general rule, I'll start with arms fully extended (as big a wing-span as I can muster), and I'll note where my wrists lie on the ground. Then I'll pull my hands inward until the tips of my thumbs rest where my wrists were. This position allows me enough leverage to get my body off the ground but is still wide enough to mimic the move. Put all your energy into your hands and force your body upward... hold for 3 seconds, then come back down. If this is too much, do pushups with your hands slightly more than shoulder width apart and work towards getting wider and wider.
Sunday, January 29, 2012
Day 7 - Wall Squats
Difficulty - Moderate
Muscle Groups Addressed - Glutes, Quadriceps, Hamstrings
 A favorite of mine, wall squats have so many great benefits, not to mention they work all the primary muscle groups involved in proper sitting posture. It's bad enough us desk jockies have to sit in front of a screen most of the day... compounding that is the fact that most of us don't even sit properly.
Over time, poor seated posture can lead to spinal misalignment, joint degeneration, weak shoulders, and even a potbelly. As you slouch forward, your shoulders and back round in, loosening your pectorals and pushing your belly out. Wall squats done correctly will firm your core, build a strong lower back, and work your hips to help give you a balanced seated posture.
 These work the same in the office as they do in the gym. Simply find a wall and lean back against it, standing up. Bending at the knees, slowly lower yourself down into a right angle seated position. Squating down too far and not having your feet out far enough will be unneeded pressure on your knees... envision sitting on a box. Stay "seated" for 10 seconds, then straighten your knees and come up, still leaning against the wall. Give yourself a 5 second break, then come back down and hold the squat for 10 seconds.
To really kick it up in the hamstrings and lower back, try raising one leg at a time, and holding.
Muscle Groups Addressed - Glutes, Quadriceps, Hamstrings
 A favorite of mine, wall squats have so many great benefits, not to mention they work all the primary muscle groups involved in proper sitting posture. It's bad enough us desk jockies have to sit in front of a screen most of the day... compounding that is the fact that most of us don't even sit properly.
 Over time, poor seated posture can lead to spinal misalignment, joint degeneration, weak shoulders, and even a potbelly. As you slouch forward, your shoulders and back round in, loosening your pectorals and pushing your belly out. Wall squats done correctly will firm your core, build a strong lower back, and work your hips to help give you a balanced seated posture.
 These work the same in the office as they do in the gym. Simply find a wall and lean back against it, standing up. Bending at the knees, slowly lower yourself down into a right angle seated position. Squating down too far and not having your feet out far enough will be unneeded pressure on your knees... envision sitting on a box. Stay "seated" for 10 seconds, then straighten your knees and come up, still leaning against the wall. Give yourself a 5 second break, then come back down and hold the squat for 10 seconds.
 To really kick it up in the hamstrings and lower back, try raising one leg at a time, and holding.
Saturday, January 28, 2012
Day 6 - Military Press
Difficulty - Easy
Muscle Groups Addressed - Deltoid (Delts), Triceps, Pectorals


Today's exercise is fairly traditional, but I'm going to show you how you can modify it to do the same work with minimal effort. That's the point of this, after all - make the traditional untraditional. You've seen the military press performed by hundreds of grunting juiceheads all across America's gym scene. Use dumbbells or a barbell for the gym version. Start with your arms up at a right angle, holding your weights at head-level. Lift the weights up, keeping your core engaged and your back straight and pause with them above your head. Do not fully lock your elbows. Then bring the weights back down to head-level and repeat for a total of 8-12 reps.

To work the same muscle groups, here's a simple isometric exercise you can do right in front of your computer. Press your palms together firmly and push. Hold for at least 10 seconds then release. You should feel the same pressure in your shoulders and arms as in the military press. Someone may walk by and think you're wishing for something... maybe bigger delts?
Friday, January 27, 2012
Day 5 - Weighted Overhead Lunges
Difficulty - Moderate
Muscle Groups Addressed - Glutes, Quadriceps, Hamstrings, Shoulders


The lunge is a ubiquitous exercise... perfect training for every sport and great at improving general mobility. Here, we'll add an overhead weight to simultaneously work the upper body. At the gym, start in a comfortable standing position, with either a dumbbell or a medicine ball held at your chest. Now, step one foot forward so that your front knee forms a 90 degree angle and your back leg is parellel (but not touching!) the floor. Simultaneously during the stepping motion, lift your arms up, driving the medicine ball or weight to the sky. Hold the lunge position for one breath, then, using power from both the front and back leg, lift up and bring the weight back to your chest. You should feel tension mostly in your glutes and shoulders as you hold the lunge position and extend your arms. Keep your back perpendicular to the floor the whole time... if you pitch forward or backward, you'll put unwanted pressure on your lower back. At work, it's the exact same principle. Either try it with a ream of paper, a book, or a box full of random desk junk. You can always do this exercise unweighted as well.
Try for 8-10 lunges per leg in the gym with good form. Keep it to 4-5 at the office to avoid grunting noises and sweating on your co-workers.
Thursday, January 26, 2012
Wellness Ninja 1
 This little guy will be making appearances all around my office in the next 100 days. A little subproject to the project...
 In the spirit of incidental wellness and all the recent protesting, I'm boycotting elevators.
Join the charge! Below is a full-rez file so you can download it and put it up around your office!

Wednesday, January 25, 2012
Day 4 - Abdominals
Difficulty - Easy-Moderate
Muscle Groups Addressed - Abdominals
There are a million ways to work your abdominal muscles and your core. Your trunk or midsection is the most commonly worked muscle in any strength and conditioning routine. No matter if you're pushing or pulling, you most likely contract your core to steady yourself and concentrate power into the muscles being isolated... If you're NOT thinking about your core during each and every exercise, START.
For our purposes, I'll show you a simple way to work your abs at your desk without rousing too much suspicion.
 A typical abdominal exercise involves contracting your rectus abdominis (try not to giggle, this is your front abdominal wall, or your six pack... trust me, you have a six-pack, even if you can't see it under the belly flab) or your obliques in a dynamic motion - flex, release, flex release, etc... You also have the option of performing an isometric abdominal exercise, as shown here in my v-sit up position. Again, play around, you can do so many things here. I'm raising my hands to my feet and holding. You can slowly pulse; you can lower your back and legs to the floor, then back up; you can bring your knees to your chest to perform what's called a jack-knife sit-up. As long as you flex at your waist, instead of just curving your back, I'm happy.
 Here's the work-friendly version. You can do these all day long under your desk without anyone ever knowing! Sit close to the edge of your chair so your straightened legs hang off the end. You can use your hands to lightly stabilize yourself or you crazy animals can go hands-less. Now, slowly raise your legs (still straight!) so that they're parallel with the floor. Hold here for a slow-count of 5 seconds. Then relax the heels (legs remain straight!) back to the ground for a second. Repeat. You may start to feel these in your hips, which is normal. To loosen those hips up... with feet planted on the ground and knees spread slightly wider than your shoulders, pitch your body forward until you feel a gentle stretch in your hips. Then go back to it!
Tuesday, January 24, 2012
Day 3 - Isometric Bicep Curls
Difficulty - Easy
Muscle Groups Addressed - Biceps


 <-- At work or at home, this exercise can be easily performed by applying upward pressure against the underside of your desk. Make sure to check for gum before you do.
Muscle Groups Addressed - Biceps
Isometric exercises do not require concentric (shortening) or eccentric (lengthening) muscle movements. In other words, recall the last time you were forcefully tugging on a wine cork and it wouldn't budge... or trying to force off a stubborn lug nut while changing a car tire. These were exertions of force that did not contract your muscles either way, but instead worked them while in a static position. This makes them particularly effective in our mission for incidental wellness, because you can generate static force against any and all immovable surfaces you find out in the world.

For the gym variation, a preacher curl bench is the best way to ensure proper form. Otherwise, just stand up straight with one foot slightly in front of the other for balance. Starting at a lowered position, one arm at a time, bring a moderate weight (50%-75% of your traditional 8-repetition bicep curl -- if you don't know what your "usual" is, go find out!) up to where your bicep and forearm form a 90 degree angle. Hold this position for 30 seconds. Switch arms and repeat. Keep your upper body and legs relaxed. If you have an exercise buddy, a fun spin is to have them grab a towel, drape it from your open palm, and then apply resistance with the towel as you keep your arm locked in its isometric position.

 <-- At work or at home, this exercise can be easily performed by applying upward pressure against the underside of your desk. Make sure to check for gum before you do.
--> Another fun variation involves getting a little undressed. Sit on the floor in a hamstring stretch position, with one foot tucked into the inner thigh of the other leg (shown to the right). Create a loop out of your belt and strap one end around your extended foot. Plant the elbow of your arm against your quad and pull the belt towards you, creating an isometric bicep curl. This variation is great because you'll also engage and stretch the hamstring that's providing counter-force for your curl.
Monday, January 23, 2012
Day 2 - Chair Pose
Difficulty - Easy
Muscle Groups Addressed - Thighs, Shoulders, Chest
 Utkatasana, or the Chair Pose, is an excellent beginners Yoga pose that can be performed anywhere, especially at your desk. Start the pose in a standing position with your feet close together. Drive your heels into the ground as you extend your hands upward and bend at the knees. Lower your butt down to a seated position and tilt your body forward, taking care not to over-bend. The empty space between your thighs and your stomach should form ~90 degree angle. The natural tendency is to over-arch the back, so do your best to keep your back straight and your ribs out. Breath gently as you hold the position for at least 30 seconds. You should feel the burn in your thighs and your shoulders as you extend your hands to the sky. If you need to lessen the tension in your shoulders, bring your arms down and hold them parallel to the floor.
Muscle Groups Addressed - Thighs, Shoulders, Chest

Sunday, January 22, 2012
Day 1 - Decline Pushups


Difficulty - Easy
Muscle Groups Addressed - Upper Pectorals, Shoulders, Triceps
Let's start with something relatively simple. The decline pushup is a great, effective exercise that can be performed virtually anywhere.
All you need is an elevated surface. In this case, I simulated the incline with a staircase at work.

 The standard decline pushup should have palms flat on the floor, shoulder width apart, and feet resting on a 1'-2' tall elevated surface, so that the body forms a rectangle with the floor. Keep your core tight, head down and slowly lower the body to the ground. Come down to a few inches above the ground, hold for a second, then drive the body back up to the starting position without locking your elbows.
The exercise can be adjusted in multiple ways to work different muscle groups. You can engage the triceps more by bringing the hands closer together, or the outer pectorals by spreading the hands farther apart. Based on the height of the incline, you can work higher on the pecs (high incline) or lower on the pecs (low incline). For the more advanced move and to really work the core, try lifting one leg in the air.
Subscribe to:
Comments (Atom)