Monday, February 6, 2012

Day 15 - Turbine

Difficulty - Moderate
Muscle Groups Addressed - Shoulders, Triceps, Core

This is an original. It combines strength and flexibility with slow, controlled, core-engaged motion.

Equipment you'll need:

1. Yourself
2. A floor

Sweet! We all have at least one of each!

Start in a plank position. Core strong, eyes on the floor below you. Tuck your pelvis and keep your back straight. Make sure your butt doesn't sag. No one likes a saggy butt. Hold this position for 5 seconds.

From this position, pick one hand (here, I started with my right hand) and begin to drift it up to the sky. Simultaneously, spin your feet in the same direction so that one foot now rests on the other. Reach your arm straight up and let your eyes rest on your hand. If the balance is still too difficult, keep your eyes focused on a spot on the floor. Keep your body a straight line from your feet to your head - don't let anything sag to the ground. Keep your core tight. Hold this position for 5 seconds.

Now, contracting your core, continue to spin your hand around until it rests on the floor with the other hand. If your shoulders/triceps feel too strained here, you can point your fingers outwards from your body. If you're feeling flexible, point your fingers straight back. Hold a straight-leg table position, with toes pointed up, butt held high, and core tight for 5 seconds.

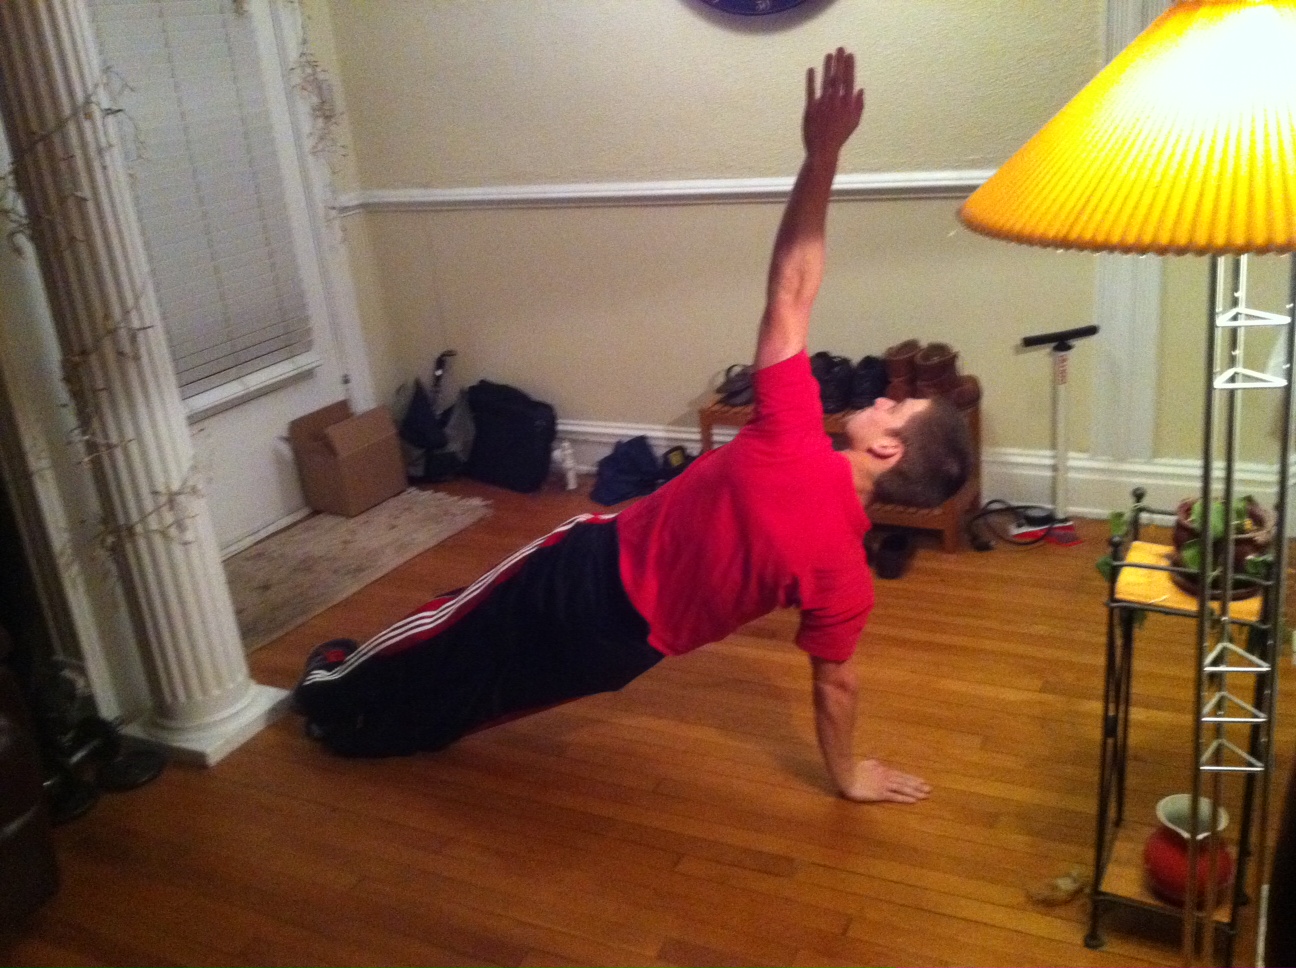
Again, use your core to come out of the table position twisting again in the same direction into a skyward reach on your other hand. Reach high with your hand and follow it with your eyes. Keep everything straight and calm. Keep the hip raised up. Same principles here, and hold for 5 seconds.

Lastly, spin one more time into a plank position. Take care not to fall into any of these poses. These should be slow, controlled movements. If you're using your core properly and moving slowly, you shouldn't feel any impact on your hands or wrists. Your body should be almost totally relaxed except for your core. Your shoulders and triceps will grow fatigued as well from supporting your weight. Once you've done one full "rotation", come back around the other way.

Sunday, February 5, 2012

Day 14 - Crane

Difficulty - Advanced
Muscle Groups Addressed - Wrists, Core, Groin

The crane pose (Bakasana) is a great builder and test of core strength and stability. Like our handstands, these should be gently eased into in order to prevent injury and muscle strain. This pose in particular should not overwork you, but should instead leave you feeling centered and flexible.

I'm still working on this pose, so my variation isn't true to proper yoga form. What you'll see here is a variation for those newer to balance yoga poses.

Start in a deep squat, with your body bent forward and a curved back. Plant your hands firmly where your eyes meet the floor. In my variation of this pose, you can see that my knees are on the outside of my elbows. A proper Bakasana pose should have your knees and upper shins tucked into your armpits. Flexibility is my weakness, but it will come with time and practice. Now start to lift up onto the balls of your feet and lean even further forward, taking the weight off of your legs and onto your upper arms and hands. Think about contracting your core and rounding your back.

Exhale, and put all of your weight on your upper palms, lifting the balls of your feet completely off the floor. You are now in crane pose. Contract your core and keep your legs tight against your arms. Stay here and breathe for 30 seconds - 1 minute.

Saturday, February 4, 2012

Day 13 - Warrior III Tucks

Difficulty - Advanced
Muscle Groups Addressed - Glutes, Hamstrings, Quads, Core

This is a borrowed move from everybody's favorite digital trainer, Tony Horton. P90X2, an at-home workout program sequel to the well-known P90X focuses heavily on balance and core-work, which I think are both well encompassed within this exercise.

A Warrior III Yoga Pose (Virabhadrasana III) looks like this:
Begin in a lunge position with one knee bent forward at a 90 degree angle and the other leg straight behind you. You can rest your arms at your side or gently on your front knee. Simultaneously bring your back leg up while straightening your front leg, and bring your hands up on either side of your head, palms facing each other. Your entire body should be parallel to the floor. Hold this pose for 5 seconds.

<< Now, slowly tilt your body upwards while bending the back leg. Keep your hands extended out by your head and raise them into the sky as your body tilts up. Hold the leg in this bent position, arms high for 5 seconds.

>> Bring the opposite arm from your raised leg (If your left knee is up, crunch with your right arm) down so that you make contact between your elbow and your knee. Use the other arm for balance as you hold this crunched position for 5 seconds. Breathe. Try to reverse the arm and leg movements back into the Warrior III pose. If your balance is waning, then bring your body down to a standing position and repeat the motion on the other leg. This is a great routine that will do amazing things for your balance and strengthen your core.

Friday, February 3, 2012

Day 12 - Handstand Pushups

Difficulty - 2xAdvanced
Muscle Groups Addressed - Shoulders/Upper Pecs

So I'm kind of obsessed with handstands now... they're insanely fun. Trust me, you'll get there if you start smart and slow. Today's move is definitely for the more advanced audience. Think of it as a fully elevated decline pushup...

See the previous day's post for the basics of how to get into a handstand. Once again, make sure you're warmed up and in the right mindset.

Once your butt is where your head should be and vice-versa, take a few deep breaths and tilt your head up a little bit. Unlike the picture, you should try to keep your legs straight... I'm playing with keeping my feet off the wall which is why my legs are flayed out a little bit for balance (next step is doing these away from the wall entirely!) Now, unlock your shoulders and your arms and slowly lower your nose towards the ground. Now come back up into a straight arm position, and repeat. Don't do too many of these, especially at first, since you want enough energy left in your core to come out of the handstand gracefully. Focus on putting all your weight in your hands. Keep your butt tucked in and your spine straight. You'll get a great shoulder/pec workout if your body is a straight line. Do these pushups nice and slow. Mix in a few isometric holds at the bottom once you're comfortable.

Thursday, February 2, 2012

Day 11 - Handstands

Difficulty - Advanced
Muscle Groups Worked - Shoulders

There are a lot of factors that go into a successful handstand, so be sure you're ready for it before you attempt it. The stand we'll do is against the wall, so the balance portion doesn't play in as much as it would on an open floor. It also eliminates the fear of toppling over your head. But you should still feel confident that you have a strong core and shoulders before you attempt this. "Muscle Groups Worked" should really read "Core, Shoulders, Core" because the process of getting in and out of the stand is entirely core-related. That said, trust me, a handstand is 100% attainable with a little practice and a little courage.

Start by warming up with a few pushups and holding a plank for ~30 seconds. First, determine which leg is your "kick-up" leg. This is your dominant foot that you would default to kick a soccer ball or punt a football with. This is the leg that you'll use to kick your body up into the air. Find a sturdy, picture-free wall (far away from grandma's ashes) and begin in a sprinter's stance, with your hands just a few inches from the wall. Keep your arms locked straight. Take a few practice "kicks", just launching off of your dominant foot a little bit. Keep your core contracted and your non-dominant foot pulled in slightly and bent at the knee. When you're ready, kick (explode!) off of your dominant foot. Don't be afraid to put some extra oomph into the kick... since you're against the wall, there's no way you're going to topple over backwards. Concentrate on putting your energy into your core as opposed to your legs. This will help you land as lightly as possible on the wall with your non-dominant foot. Once you hit, or rather, lightly graze the wall, pause for a second and ensure you have your balance. When you're confident that you can support yourself in this position, straight your non-dominant leg to join your other straight leg. Keep your body straight. Now pause and breathe... slowly. Feel the weight in your hands. As you hold this position, you'll start to feel a burn in your shoulders. When you're ready to come out, ensure your core is tightened, and slowly bring your body back the same way you came up. Think of it almost as a reverse crunch. You should not be landing with any sort of velocity on the ground if you're tightening your core properly. You just did a handstand! Wait... you just did a freaking handstand?! As you get more comfortable, you can start playing with floating away from the wall a little bit to assess your balance. You'll be popping handstands in the hall at work in no time :)

Wednesday, February 1, 2012

Day 10 - Tricep Dips

Difficulty - Easy
Muscle Groups Addressed - Triceps, Shoulders

Tricep dips are an incidental wellness no-brainer. An exercise that you can literally do anywhere, there is something simply sweet about something so sweetly simple. Exactly the same in the gym as it is in your hotel room (or home/office), you'll need two elevated surfaces (or you can perform it starting in a table pose on the floor) to perform a dip.

Start with your hands under your shoulders, arms extended on one surface. Your legs should be straight with your heels resting on top of the other surface. Here, I used a chair and the bed... You can easily use two beds, or a chair and a desk, two chairs, or just do this exercise on the floor. Slowly lower your body down until your triceps and your forearms form a right angle, then come back up. If you want to add an element, pick one of your feet up slightly and hold it there. If you have a friend with you, have him/her place a weight (books, boxes, suitcase) on top of your lap.

Tuesday, January 31, 2012

Day 9 - Knee to Chest Stretch

Difficulty - Easy
Muscle Groups Addressed - Lower Back, Hip

So I was traveling today, and a friend smartly suggested that I post an exercise that you could perform on an airplane. Your options are limited here, especially if you're crammed into a window seat like I was, but I've been preaching that you can discover wellness opportunities anywhere, and this circumstance is no different.
I was going to get the passenger next to me to snap a picture, but he was literally asleep from the moment the doors shut to the moment they re-opened. So you'll have to use your imagination as I try to explain this stretch as thoroughly as I can.
In your seat, assume proper posture - feet flat on the ground, shoudlers square, pelvis tucked in. Wrap your hands under one of your knees and gently start to bring your knee up towards your chest. Continue to pull your knee up until you feel a slight stretch in your lower back (you may also feel a little tension in your hip). Hold this position for 30 seconds. Switch legs and repeat. This stretch will help release tension in your lower back, which is most likely screaming from having to sit in a terrible airplane seat for a few hours (mine definitely was!). Come back for more tomorrow!