Difficulty - Moderate
Muscle Groups Addressed - Obliques
You can do side-bends or situps....
A great standing exercise you can do at your desk... side-bends can be weighted or unweighted. Regardless, you'll feel a great burn in your obliques and also in your shoulders by adding the right angle yoga move.
Begin in a standing position, and bend slowly to one side. Feel free to stop when you feel a slight stretch in your side, or continue to bend down until you can place your fingertips on the ground or close to it. As you bend, extend your other arm skyward so that both of your arms are perpendicular to the ground. Now come up and repeat on the other side. Boom! Sides stretched.
Showing posts with label Core. Show all posts
Showing posts with label Core. Show all posts
Tuesday, March 13, 2012
Wednesday, February 22, 2012
Day 25 - Incline Pushups + Single Leg Crunch
Difficulty - Moderate
Muscle Groups Addressed - Pectorals, Delts, Triceps, Core
Greetings! Back after a week hiatus and ready to supply more exercises for those of you hungry for more ways to move.
Today's exercise is a simple and effective combination motion. You'll mix a standard elevated (incline) pushup with a prone single leg crunch, mixing upper body and core strength to create a perfect storm of total body conditioning.
In the gym or at your desk, assume a plank position on an elevated surface. Concentrate on maintaining a straight-line body and a tight core. As in all plank starts, don't forget to breathe! Keep your feet together and your arms locked straight. From this position, do a standard pushup, making sure to complete the motion (all the way down until your chest is a few inches above the surface, then all the way up). Once back at the top, bring one leg off the ground and crunch your knee to your elbow on the same side. It's ok if you can't bring your knee all the way up, just make sure you contract your core and breathe. Plant your foot back on the ground, complete another pushup, and crunch with the opposite leg. Perform 8-10 repetitions on both sides for a total of 16-20 pushups. Remember these pushups are easier because of the elevated position of your hands. If you still can't do as many, try these against a taller surface or even a vertical wall.
Thursday, February 16, 2012
Day 24 - Ab Twists
Difficulty - Moderate
Muscle Groups Addressed - Rec
Now come on, baby... and do the twist!
Why anyone would purchase this nonsense is completely beyond me: http://amzn.com/B004G7D5GO
Let me show you a much easier (and arguably more effective) way to work your abdominals and obliques, right in the comfort of your very own desk chair!
Rotate around the ribcage. Any weight under 10 pounds will do. Keep your knees glued together. Stabilize from your hips to your ankles. Exhale as you rotate, inhale as you come to the center. Avoid rounding out the back. Remain in a tall, upright position. Avoid hunching forward at the shoulder blades.
To perform at your desk, sit tall in your chair and lift your legs up so that they are parallel to the floor (see Day 4 post!). Now slowly rotate your torso from side to side, tapping your arm-rests with your elbows if you have them (arm-rests that is... hopefully you have elbows).
Wednesday, February 8, 2012
Day 17 - Suspended Leg Raise
Difficulty - Moderate/Advanced
Muscle Groups Addressed - Core, Shoulders, Lats, Biceps
The first suspended/pull-up exercise! Wooooot! To those of you who would retort, "but I don't have a pull-up bar!" I say pish-posh. There's always something to hang from. A doorframe, tree branch, a tall friend's bicep. Just find something above your head and get to danglin'!


We'll start with a simple hang. With hands shoulder-width apart, just hang down from your surface of choice. Here, I'm suspended from my door frame, with my toes on the floor. For this exercise, it's fine if you toe-tap in between reps, if only to keep yourself from swinging.
Now slowly lift your feet upwards. Attempt to keep your knees locked, legs straight as you do so. Lower your legs back down to a hanging position (tap your toes to steady yourself) and then repeat. Shoot for 8-10 repetitions.

 For an advanced version and to really engage your lats, pull yourself up part way, so that your biceps and forearms are locked at a 90 degree angle. Now perform the leg lift exercise the same way, but keeping your arms locked at the top. Yikes!
Tuesday, February 7, 2012
Day 16 - Ball Knee Tucks
Difficulty - Moderate
Muscle Groups Addressed - Core, Shoulders
The knee tuck is one of my favorite ab exercises. In addition to micro-targeting your abdominals with the crunch motion, the jack knife works your obliques and core stabilizing muscles.
You'll need a stability ball for the gym version - or a chair with wheels for the work version. Begin in an elevated plank with your feet up on the stability ball, fairly close together. For an easier version, rest your shins on the ball. For a more advanced variation, stay up on your toes. Keeping your arms perpendicular to the ground, exhale slowly, contract your core, and roll the ball in with your feet. Keep your body as calm as possible (you might shake a little bit), as you bring your knees in as far as you can to your chest. If you can contract the entire way, your feet will be sitting flat against the ball at this point. Now inhale as you extend your body back to the starting plank position. Shoot for 10 repetitions.
If you don't have a rolling chair at work, get into an elevated plank on any sturdy, stationary surface and tuck your knees in to your chest, one leg at a time, leaving the other leg planted on the chair.
Monday, February 6, 2012
Day 15 - Turbine
Difficulty - Moderate
Muscle Groups Addressed - Shoulders, Triceps, Core
This is an original. It combines strength and flexibility with slow, controlled, core-engaged motion.
Equipment you'll need:
1. Yourself
2. A floor
Sweet! We all have at least one of each!
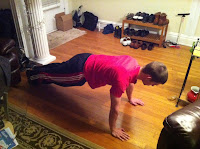 Start in a plank position. Core strong, eyes on the floor below you. Tuck your pelvis and keep your back straight. Make sure your butt doesn't sag. No one likes a saggy butt. Hold this position for 5 seconds.
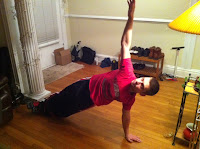 From this position, pick one hand (here, I started with my right hand) and begin to drift it up to the sky. Simultaneously, spin your feet in the same direction so that one foot now rests on the other. Reach your arm straight up and let your eyes rest on your hand. If the balance is still too difficult, keep your eyes focused on a spot on the floor. Keep your body a straight line from your feet to your head - don't let anything sag to the ground. Keep your core tight. Hold this position for 5 seconds.
 Now, contracting your core, continue to spin your hand around until it rests on the floor with the other hand. If your shoulders/triceps feel too strained here, you can point your fingers outwards from your body. If you're feeling flexible, point your fingers straight back. Hold a straight-leg table position, with toes pointed up, butt held high, and core tight for 5 seconds.
 Again, use your core to come out of the table position twisting again in the same direction into a skyward reach on your other hand. Reach high with your hand and follow it with your eyes. Keep everything straight and calm. Keep the hip raised up. Same principles here, and hold for 5 seconds.
Lastly, spin one more time into a plank position. Take care not to fall into any of these poses. These should be slow, controlled movements. If you're using your core properly and moving slowly, you shouldn't feel any impact on your hands or wrists. Your body should be almost totally relaxed except for your core. Your shoulders and triceps will grow fatigued as well from supporting your weight. Once you've done one full "rotation", come back around the other way.
Saturday, February 4, 2012
Day 13 - Warrior III Tucks
Difficulty - Advanced
Muscle Groups Addressed - Glutes, Hamstrings, Quads, Core
This is a borrowed move from everybody's favorite digital trainer, Tony Horton. P90X2, an at-home workout program sequel to the well-known P90X focuses heavily on balance and core-work, which I think are both well encompassed within this exercise.
 A Warrior III Yoga Pose (Virabhadrasana III) looks like this:
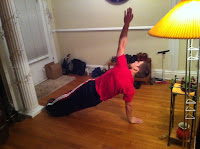
Begin in a lunge position with one knee bent forward at a 90 degree angle and the other leg straight behind you. You can rest your arms at your side or gently on your front knee. Simultaneously bring your back leg up while straightening your front leg, and bring your hands up on either side of your head, palms facing each other. Your entire body should be parallel to the floor. Hold this pose for 5 seconds.

 << Now, slowly tilt your body upwards while bending the back leg. Keep your hands extended out by your head and raise them into the sky as your body tilts up. Hold the leg in this bent position, arms high for 5 seconds.
>> Bring the opposite arm from your raised leg (If your left knee is up, crunch with your right arm) down so that you make contact between your elbow and your knee. Use the other arm for balance as you hold this crunched position for 5 seconds. Breathe. Try to reverse the arm and leg movements back into the Warrior III pose. If your balance is waning, then bring your body down to a standing position and repeat the motion on the other leg. This is a great routine that will do amazing things for your balance and strengthen your core.
Muscle Groups Addressed - Glutes, Hamstrings, Quads, Core
This is a borrowed move from everybody's favorite digital trainer, Tony Horton. P90X2, an at-home workout program sequel to the well-known P90X focuses heavily on balance and core-work, which I think are both well encompassed within this exercise.
 A Warrior III Yoga Pose (Virabhadrasana III) looks like this:
 Begin in a lunge position with one knee bent forward at a 90 degree angle and the other leg straight behind you. You can rest your arms at your side or gently on your front knee. Simultaneously bring your back leg up while straightening your front leg, and bring your hands up on either side of your head, palms facing each other. Your entire body should be parallel to the floor. Hold this pose for 5 seconds.

 << Now, slowly tilt your body upwards while bending the back leg. Keep your hands extended out by your head and raise them into the sky as your body tilts up. Hold the leg in this bent position, arms high for 5 seconds.
 >> Bring the opposite arm from your raised leg (If your left knee is up, crunch with your right arm) down so that you make contact between your elbow and your knee. Use the other arm for balance as you hold this crunched position for 5 seconds. Breathe. Try to reverse the arm and leg movements back into the Warrior III pose. If your balance is waning, then bring your body down to a standing position and repeat the motion on the other leg. This is a great routine that will do amazing things for your balance and strengthen your core.
Friday, February 3, 2012
Day 12 - Handstand Pushups
Difficulty - 2xAdvanced
Muscle Groups Addressed - Shoulders/Upper Pecs
 So I'm kind of obsessed with handstands now... they're insanely fun. Trust me, you'll get there if you start smart and slow. Today's move is definitely for the more advanced audience. Think of it as a fully elevated decline pushup...
See the previous day's post for the basics of how to get into a handstand. Once again, make sure you're warmed up and in the right mindset.

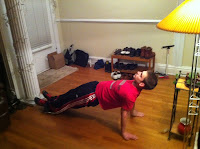
 Once your butt is where your head should be and vice-versa, take a few deep breaths and tilt your head up a little bit. Unlike the picture, you should try to keep your legs straight... I'm playing with keeping my feet off the wall which is why my legs are flayed out a little bit for balance (next step is doing these away from the wall entirely!) Now, unlock your shoulders and your arms and slowly lower your nose towards the ground. Now come back up into a straight arm position, and repeat. Don't do too many of these, especially at first, since you want enough energy left in your core to come out of the handstand gracefully. Focus on putting all your weight in your hands. Keep your butt tucked in and your spine straight. You'll get a great shoulder/pec workout if your body is a straight line. Do these pushups nice and slow. Mix in a few isometric holds at the bottom once you're comfortable.
Muscle Groups Addressed - Shoulders/Upper Pecs

See the previous day's post for the basics of how to get into a handstand. Once again, make sure you're warmed up and in the right mindset.

 Once your butt is where your head should be and vice-versa, take a few deep breaths and tilt your head up a little bit. Unlike the picture, you should try to keep your legs straight... I'm playing with keeping my feet off the wall which is why my legs are flayed out a little bit for balance (next step is doing these away from the wall entirely!) Now, unlock your shoulders and your arms and slowly lower your nose towards the ground. Now come back up into a straight arm position, and repeat. Don't do too many of these, especially at first, since you want enough energy left in your core to come out of the handstand gracefully. Focus on putting all your weight in your hands. Keep your butt tucked in and your spine straight. You'll get a great shoulder/pec workout if your body is a straight line. Do these pushups nice and slow. Mix in a few isometric holds at the bottom once you're comfortable.
Thursday, February 2, 2012
Day 11 - Handstands
Difficulty - Advanced
Muscle Groups Worked - Shoulders
There are a lot of factors that go into a successful handstand, so be sure you're ready for it before you attempt it. The stand we'll do is against the wall, so the balance portion doesn't play in as much as it would on an open floor. It also eliminates the fear of toppling over your head. But you should still feel confident that you have a strong core and shoulders before you attempt this. "Muscle Groups Worked" should really read "Core, Shoulders, Core" because the process of getting in and out of the stand is entirely core-related. That said, trust me, a handstand is 100% attainable with a little practice and a little courage.
 Start by warming up with a few pushups and holding a plank for ~30 seconds. First, determine which leg is your "kick-up" leg. This is your dominant foot that you would default to kick a soccer ball or punt a football with. This is the leg that you'll use to kick your body up into the air. Find a sturdy, picture-free wall (far away from grandma's ashes) and begin in a sprinter's stance, with your hands just a few inches from the wall. Keep your arms locked straight. Take a few practice "kicks", just launching off of your dominant foot a little bit. Keep your core contracted and your non-dominant foot pulled in slightly and bent at the knee. When you're ready, kick (explode!) off of your dominant foot. Don't be afraid to put some extra oomph into the kick... since you're against the wall, there's no way you're going to topple over backwards. Concentrate on putting your energy into your core as opposed to your legs. This will help you land as lightly as possible on the wall with your non-dominant foot. Once you hit, or rather, lightly graze the wall, pause for a second and ensure you have your balance. When you're confident that you can support yourself in this position, straight your non-dominant leg to join your other straight leg. Keep your body straight. Now pause and breathe... slowly. Feel the weight in your hands. As you hold this position, you'll start to feel a burn in your shoulders. When you're ready to come out, ensure your core is tightened, and slowly bring your body back the same way you came up. Think of it almost as a reverse crunch. You should not be landing with any sort of velocity on the ground if you're tightening your core properly. You just did a handstand! Wait... you just did a freaking handstand?! As you get more comfortable, you can start playing with floating away from the wall a little bit to assess your balance. You'll be popping handstands in the hall at work in no time :)
Muscle Groups Worked - Shoulders
There are a lot of factors that go into a successful handstand, so be sure you're ready for it before you attempt it. The stand we'll do is against the wall, so the balance portion doesn't play in as much as it would on an open floor. It also eliminates the fear of toppling over your head. But you should still feel confident that you have a strong core and shoulders before you attempt this. "Muscle Groups Worked" should really read "Core, Shoulders, Core" because the process of getting in and out of the stand is entirely core-related. That said, trust me, a handstand is 100% attainable with a little practice and a little courage.

Subscribe to:
Posts (Atom)